Version: 8.0.x

API Authentication

We have four types of user authentication in Openhim: Local, Basic, Openid and Token (deprecated), described below.

All of these types will create a session for each authenticated user and will send a response header "Set-Cookie" to authenticate the other incoming requests.

The session will be saved in the "Session" Mongo collection.

The password related fields will be saved in the "Passport" Mongo collection.

Some configurations can be updated according to the use case:

"api": {
// The session secret key used for the hashing of signed cookie (used to detect if the client modified the cookie)
// Signed cookie is another cookie of the same name with the .sig suffix appended
"sessionKey": "r8q,+&1LM3)CD*zAGpx1xm{NeQhc;#",
// The session max age is the session cookie expiration time (in milliseconds)
"maxAge": 7200000,
// The number of characters that will be used to generate a random salt for the encryption of passwords
"salt": 10,
// The types of authentication to use for the API
// Supported types are "token" and "basic" and "local"
// * "local" means through the UI with hitting "/authentication/local" endpoint with username and password,
// this will create a session for the user and set cookies in the browser.
// * "basic" means with basic auth either through browser or postman by giving also username and password.
// * "openid" means with a third party authentication provider (e.g. keycloak).
// * [Deprecated] "token" means that a request should provide in the header an 'auth-token', 'auth-salt' and 'auth-ts' to be authenticated.
"authenicationTypes": ["token"],
// Openid connect provider configuration needed for the authentication
"openid": {
// OpenID configuration
}
}

Local authentication#

This type of authentication uses the local authentication protocol (Local passport module). It is the most widely used way for websites to authenticate users via username and/or email as well as a password.

For more information on local authentication in Passport.js, check out: http://passportjs.org/guide/username-password/

Authentication endpoint#

To be authenticated using the local protocol, you can hit this route:

POST https://<server>:8080/authenticate/local

With a body that contains the following user details:

{
"username": "<email>",
"password": "<password>"
}

Basic authentication#

This is very similar to the Local authentication, except that it uses the Basic passport module and every request to any endpoint should be authenticated.

For more information on basic authentication in Passport.js, check out: https://www.passportjs.org/packages/passport-http/

If this type of authentication is enabled then you can add this header to your request:

"headers": {
// ...,
"Authorization": "Basic Buffer.from(`${<email>}:${<password>}`).toString('base64');"
}

OpenID authentication#

This authentication uses OpenID Connect Authentication Protocol, this will require enabling this auth type in the Openhim Core and also providing the necessary configurations.

For more information on OpenID connect Protocol in Passport.js, check out: http://www.passportjs.org/packages/passport-openidconnect/

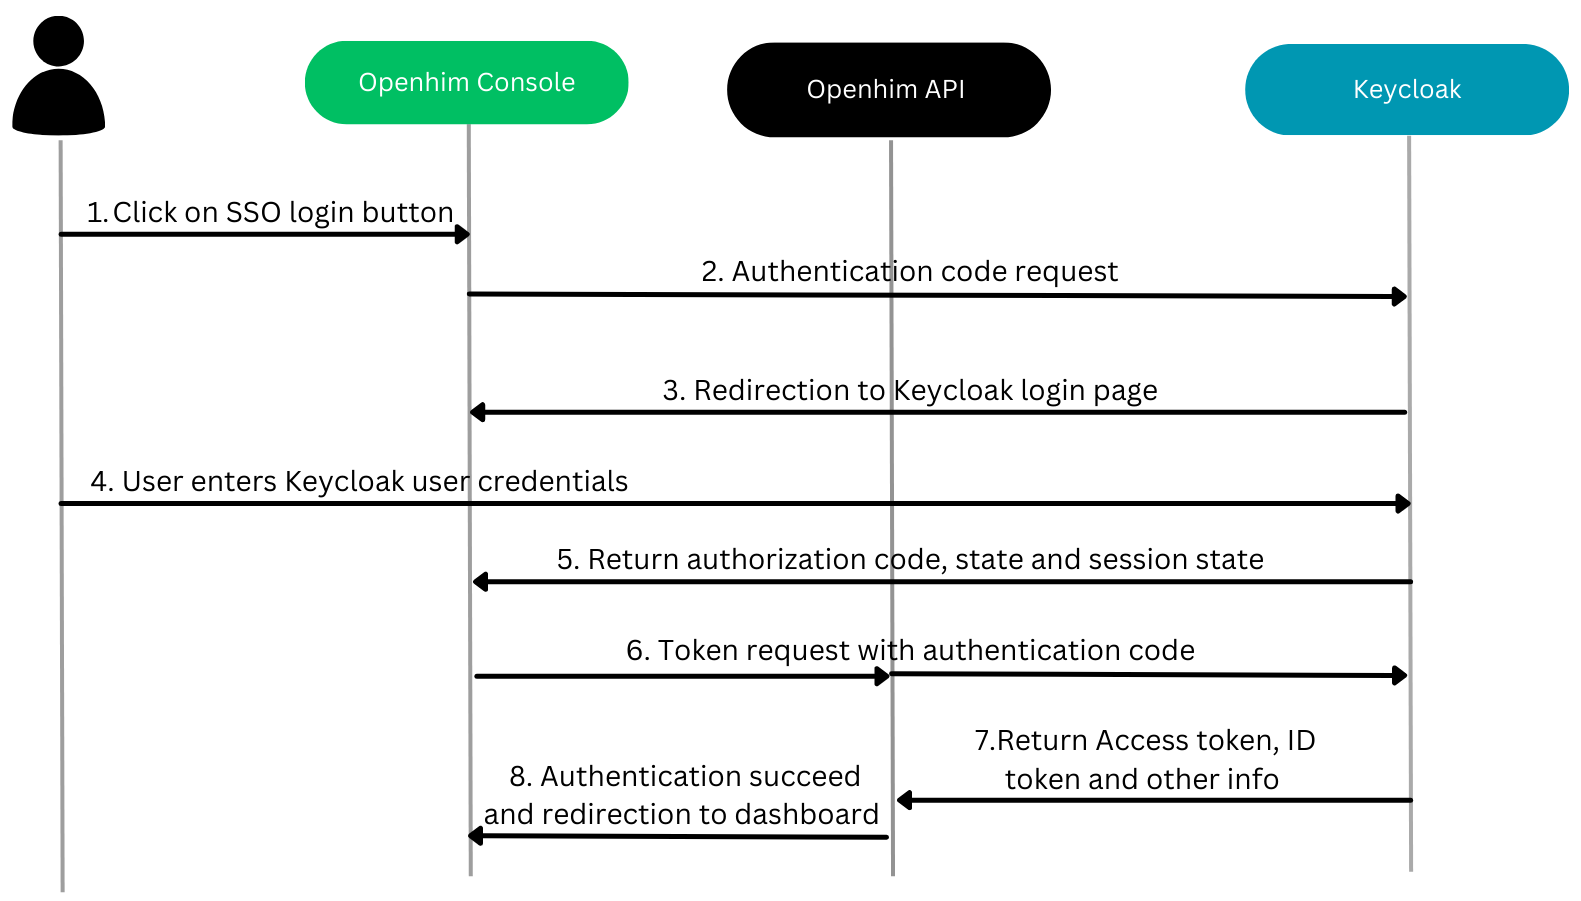
The image below illustrates the openid authentication flow with Keycloak as an example of identity access manager.

Openid Authentication Flow

OpenID configuration#

This configuration should be adapted according to your use case.

"api": {
// The types of authentication to use for the API
// Supported types are "token" and "basic" and "local"
// * "local" means through the UI with hitting "/authentication/local" endpoint with username and password,
// this will create a session for the user and set cookies in the browser.
// * "basic" means with basic auth either through browser or postman by giving also username and password.
// * "openid" means with a third party authentication provider (e.g. keycloak).
// * [Deprecated] "token" means that a request should provide in the header an 'auth-token', 'auth-salt' and 'auth-ts' to be authenticated.
"authenicationTypes": ["openid"],
// Openid connect provider configuration needed for the authentication
"openid": {
// Openid connect provider realm url link
"url": "http://localhost:9088/realms/platform-realm",
// Callback URL used by openid connect provider (should be the same callback URL specified in realm)
"callbackUrl": "http://localhost:9000",
// CLient ID specified in the realm
"clientId": "openhim-oauth",
// Client secret specified in the realm
"clientSecret": "tZKfEbWf0Ka5HBNZwFrdSyQH2xT1sNMR",
// Scopes to be requested from Openid connect provider
"scope": "openid email profile offline_access roles"
}
}

Authentication endpoint#

To be authenticated using OpenID, you can hit this route:

POST https://<server>:8080/authenticate/openid

With a body that contains:

{
"code": "<code>",
"sessionState": "<session_state>",
"state":" <state>"
}

Token authentication [DEPRECATED]#

Construct authentication headers#

Each and every API call that is made to the OpenHIM has to be authenticated. The authentication mechanism that is used can be fairly complex to work with however it provides decent security.

The authentication mechanism is based on http://stackoverflow.com/a/9387289/588776.

Initial authentication notification#

The user notifies the API that it wants to use its authenticated service:

GET https://<server>:8080/authenticate/<user_email>

If you don't have a user account yet, you can use the root user. The default root user details are as follows:

username: root password: openhim-password (you should change this on a production installation!)

The server will respond with the salt that was used to calculate the clients passwordHash (during user registration):

{
"salt": "xxx",
"ts": "xxx"
}

You must calculate a passwordhash using the received salt and the supplied user password. passwordhash = (sha512(salt + password))

For subsequent requests to the API#

For every request you must add the following additional HTTP headers to the request:

auth-username: <username>
auth-ts: <the current timestamp - in the following format '2014-10-20T13:19:32.380Z' - user time must be in sync with server time for request to work>
auth-salt: <random uuid salt that you generate>
auth-token: <= sha512(passwordhash + auth-salt + auth-ts) >

The server will authorise this request by calculating sha512(passwordhash + auth-salt + auth-ts) using the passwordhash from its own database and ensuring that:

  • this is equal to auth-token
  • the auth-ts isn't more than 2 seconds old

If these 2 conditions true the request is allowed.

Examples#

Token authentication#

Below are a few examples of how to achieve the correct request headers to authenticate to the OpenHIM API

// openhim-api.js
const crypto = require('crypto')
const request = require('request')
// authenticate the username is valid
const authenticate = async (options) => {
return new Promise((resolve, reject) => {
// authenticate the username
let reqOptions = {
url: `${options.apiURL}/authenticate/${options.username}`,
rejectUnauthorized: options.rejectUnauthorized
}
request.get(reqOptions, (err, resp, body) => {
if (err){
return reject(err)
}
// if user isn't found
if (resp.statusCode !== 200) {
return reject(new Error(`User ${options.username} not found when authenticating with core API`))
}
try {
body = JSON.parse(body)
resolve(body)
} catch (err) {
reject(err)
}
})
})
}
// Generate the relevant auth headers
const genAuthHeaders = async (options) => {
const authDetails = await authenticate(options)
const salt = authDetails.salt
const now = new Date()
// create passhash
let shasum = crypto.createHash('sha512')
shasum.update(salt + options.password)
const passhash = shasum.digest('hex')
// create token
shasum = crypto.createHash('sha512')
shasum.update(passhash + salt + now)
const token = shasum.digest('hex')
// define request headers with auth credentials
return {
'auth-username': options.username,
'auth-ts': now,
'auth-salt': salt,
'auth-token': token
}
}